Automated GPU development environments on AWS
AI engineers and data scientists are often bottlenecked by local computing resources. Training large AI models, processing massive datasets, or rendering complex 3D models can take days on CPU hardware compared to hours on a GPU.
With Gitpod GPU support you can instantly access powerful dedicated GPU instances, with full persistent storage and SSH access all in the click of a button with zero configuration so you can focus on your data and models.
Gitpod: Secure automated development environments
Gitpod is a platform for secure and automated development environments. You specify your environment dependencies in a Dev Container and dockerfile to eliminate “works on my machine” problems and get a one-click development environment with all the dependencies needed to start your work. In this case we need to have our languages like Python installed, GPU hardware and CUDA drivers. Gitpod is self-hosted in your own cloud account to enable enterprise and highly secure organizations to automate their development environments.
For GPU development, this means:
- No local GPU hardware is required
- Pre-configured CUDA drivers and ML frameworks
- Persistent storage for your datasets
- Pay only for the environments you use
GPU development environments powered by AWS
This guide will walk you through setting up Gitpod with AWS GPU instances. While costs vary based on usage and instance type (ranging from ~$0.50 to $30+ per hour) you only pay for the time your environment is active. In this guide we’ll configure a g5.xlarge with 150 GiB Disk of persistent storage.
By the end of this guide, you’ll have:
- A GPU-enabled development environment accessible from anywhere
- A reusable GPU development environment config you can share with your team
- The ability to switch different GPU performance profiles based on your needs
- A private development environment setup running in your AWS account
Expected setup time: ~20-30 minutes
Prerequisites
- An AWS account with permissions to create EC2 instances
- A GitHub repository where you’ll store your environment configuration
- (Optional) Basic familiarity with Docker and container concepts
Step 1: Configuring your self-hosted GPU instances
Before diving into the environment configuration let’s get create our foundations:
- Organization: Your workspace in Gitpod
- Runner: Your connection to AWS GPU resources
- Environment Class: Your specific GPU configuration
With the above in place you can start an environment directly in Gitpod and iterate on your configuration. If you want you can skip this step and move onto the Dev Container configuration below if you want to configure your environment outside of Gitpod.
Create an organization
If you don’t have an organization already head to app.gitpod.io to create yours. An organization can just be for you personally but when you need to invite others you can also then invite others.
Create a runner
A runner is like a bridge between Gitpod and your AWS account and it allows Gitpod to create GPU-enabled environments using your own AWS resources. Once your runner is set up you don’t need to modify it again.
See: the AWS Runner docs for more.
Estimated time to create: 10 minutes
(The CloudFormation template takes 3 minutes to install)
Choosing your GPU performance profile using environment classes
Your runner is the architecture that enables you to create your development environments in your AWS account. You now must also choose which environment performance profiles you need using classes.
Environment classes are like t-shirt sizes for your GPU environment. They define:
- How powerful your GPU will be
- How much storage you’ll need
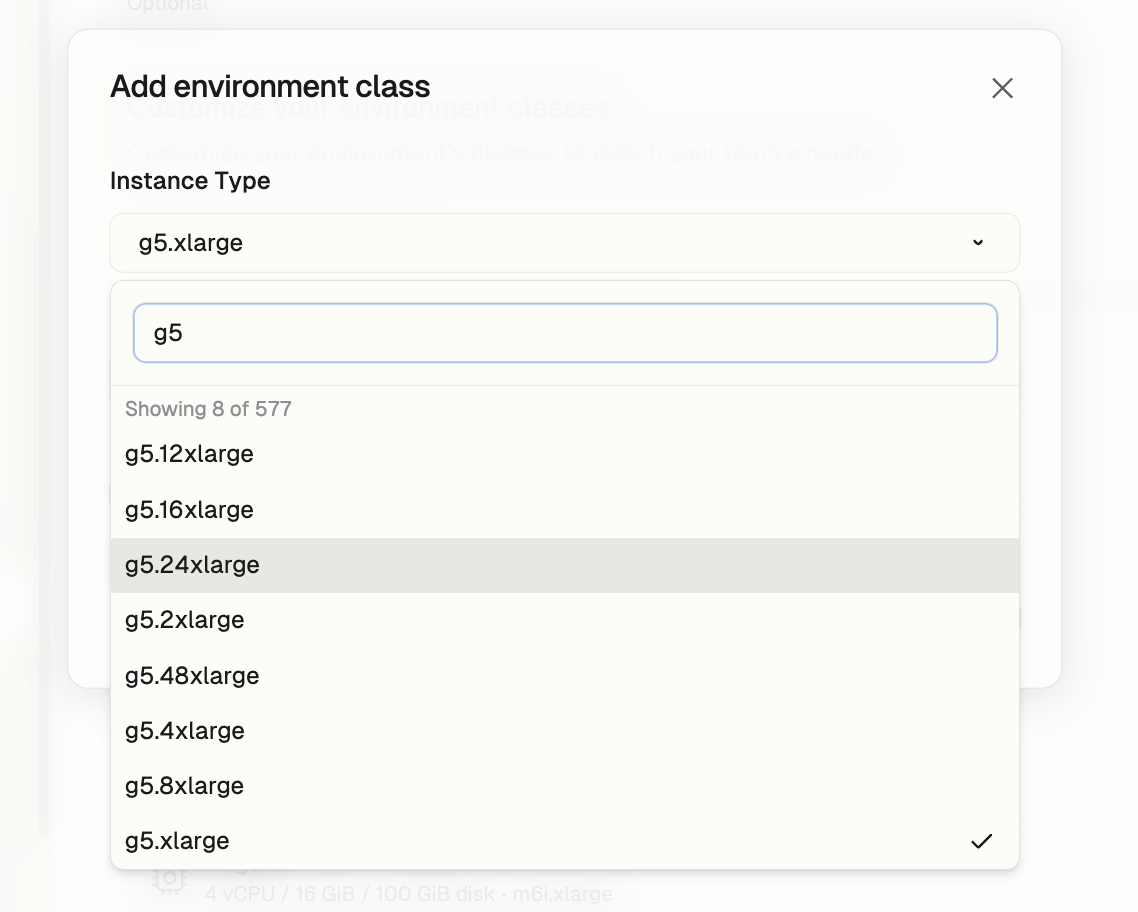
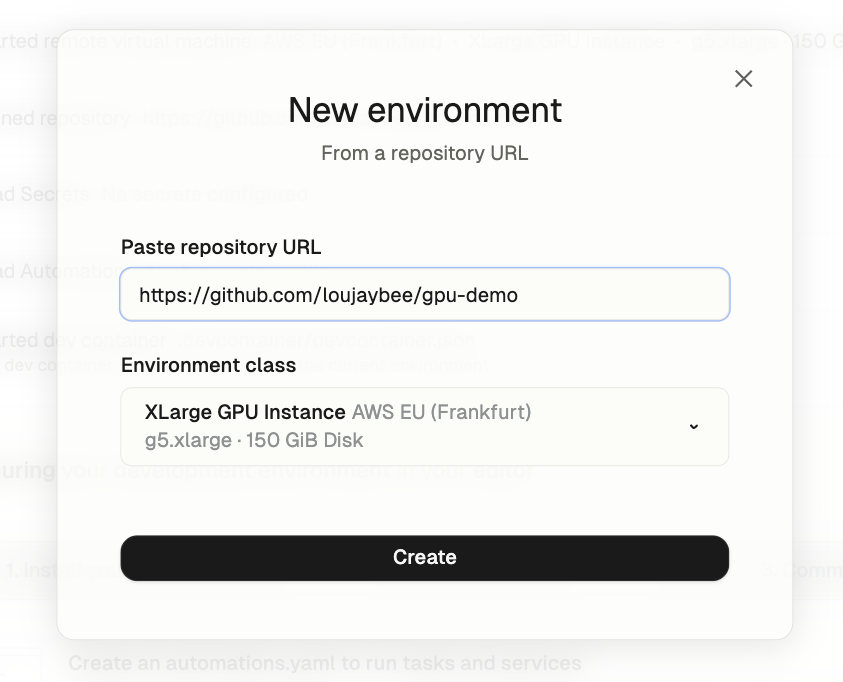
In this guide we’ll configure a g5.xlarge with 150GB of storage. But you can configure as many different performance profiles as you need for doing different types of work (e.g. more or less power, or storage). We recommend starting with:
- Instance: g5.xlarge (good balance of power and cost)
- Storage: 150 GB (enough for most datasets and models)
When choosing an environment class you must specify:
- A descriptive name for the environment class (to be easily referenced later)
- The underlying AWS EC2 instance type performance type
- The amount of persistent storage required
When choosing your instance type consider the following instance type families:
- G5 instances (NVIDIA A10G): Best for general ML development
- P4 instances (NVIDIA A100): Ideal for large model training
- Inf1/2 instances: Optimized for deployment and inference
Step 2: Configuring a Dev Container
The following guide is based on this demo repository - follow the steps below, or use the repository as a quick start.
Once you’ve set up your runner and environment classes you should now be able to start an environment. Create a new empty repository or open an existing repository.
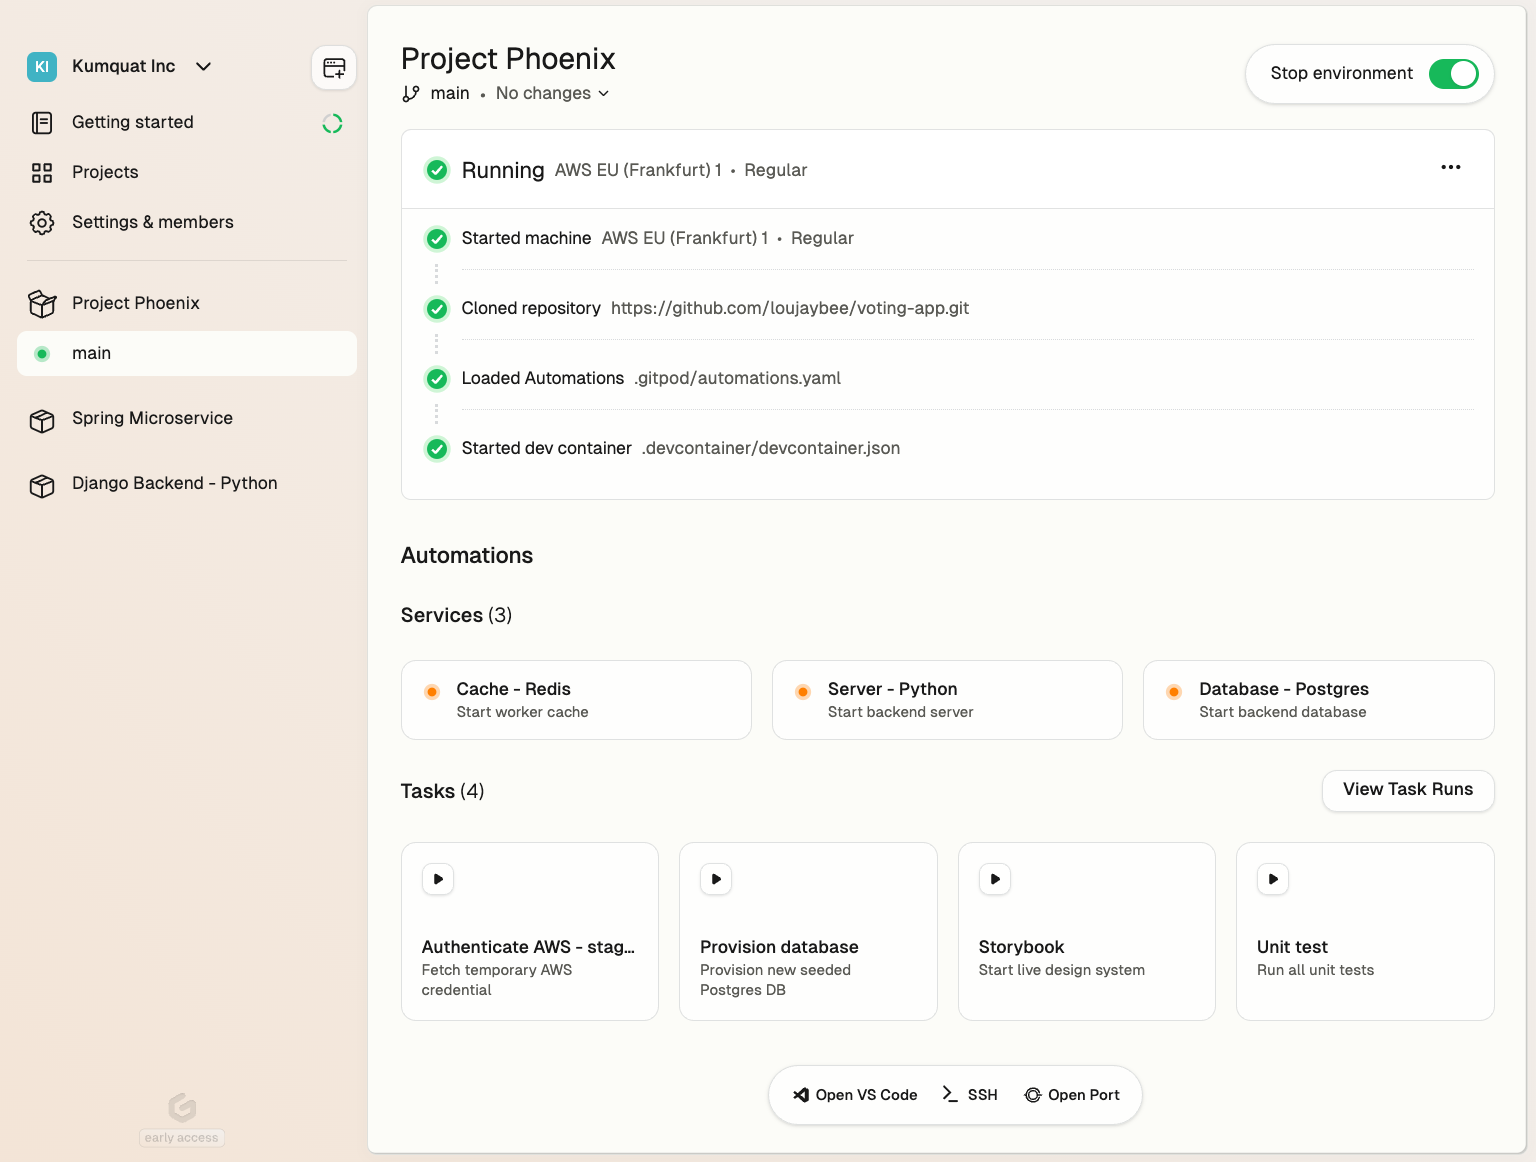
Start the environment in Gitpod. When the environment loads, click “Open VS Code” to open the environment in your desktop VS Code configuration.
Dev Container overview
You can think of a Dev Container configuration like a recipe for your development environment. Just as a recipe lists ingredients (Python, CUDA) and steps (installation, configuration), your Dev Container tells Gitpod exactly how to set up your environment.
Dev Container is a well adopted configuration format and is well documented with many blogs and tutorials. In this example we also set up CUDA which is NVIDIA technology that allows your code to use the power of GPUs: think of it like a translator between your ML code and the GPU hardware.
We’ll provide a working configuration you can use right away, then explain each part.
We’ll use two configuration files:
- devcontainer.json: Tells Gitpod what resources and features you need
- Dockerfile: Lists the software to install
Copy these files to a .devcontainer folder in your repository. This configuration should work with most ML frameworks like PyTorch and TensorFlow.
See: https://containers.dev for a comprehensive introduction to Dev Containers.
Here’s the example Dev Container (.devcontainer/devcontainer.json)

 json
json{
"dockerFile": "Dockerfile",
"hostRequirements": {
"gpu": "optional"
},
"runArgs": ["--gpus=all", "--privileged"],
"mounts": [
"source=${localWorkspaceFolder},target=/workspace,type=bind,consistency=cached"
],
"workspaceFolder": "/workspace",
"features": {
"ghcr.io/devcontainers/features/nvidia-cuda:1": {}
}
}And the example Docker file (.devcontainer/Dockerfile))
dockerfileFROM mcr.microsoft.com/vscode/devcontainers/base:ubuntuLet’s go through each property step-by-step to explain how they work.
Property: Docker
The Docker configuration is a Dockerfile that contains any dependencies or packages or tools that should be installed into the development environment when it starts.
json"dockerFile": "Dockerfile",For this simple case we only need a basic Ubuntu setup:
dockerfileFROM mcr.microsoft.com/vscode/devcontainers/base:ubuntuProperty: Host Requirements
This property tells Gitpod that the container can use GPU resources but doesn’t strictly require them. The “optional” setting means the container can still run on hosts without GPU access, making the development environment more flexible.
json"hostRequirements": { "gpu": "optional" }Property: Run Args
json"runArgs": [ "--gpus=all", "--privileged" ]These are crucial Docker runtime arguments for GPU support:
"--gpus=all"exposes all available GPUs to the container"--privileged"grants extended privileges to the container which is necessary for GPU access and CUDA operations
Note: The --privileged flag is a Docker container configuration option that grants the container nearly all the same capabilities as the host system. When productionizing this template consider explicitly specifying only the capabilities your container needs.
Property: Mounts
json"mounts": [ "source=${localWorkspaceFolder},target=/workspace,type=bind,consistency=cached" ]Configures how the local workspace is mounted in the container:
"source=${localWorkspaceFolder}"refers to your project directory"target=/workspace"maps it to /workspace inside the container"type=bind"creates a direct binding between host and container"consistency=cached"optimizes performance by caching file operations
Property: Workspace Folder
json"workspaceFolder": "/workspace"Sets the default working directory inside the container to /workspace, ensuring consistency with the mounted workspace.
Property: Features
json"features": { "ghcr.io/devcontainers/features/nvidia-cuda:1": {} }“Features” in Dev Containers are reusable, modular components that automate environment setup, you can think of them as pre-packaged scripts that handle complex installations and configurations. In this case the NVIDIA CUDA feature does several important things:
- Pulls the feature definition from GitHub Container Registry (ghcr.io)
- Automatically detects the host GPU and installs compatible NVIDIA drivers
- Sets up the CUDA toolkit with commonly used versions and dependencies
- Configures environment variables and paths needed for GPU development
- Handles version compatibility between drivers and CUDA components
- Validates the installation and GPU accessibility
This feature is particularly valuable because:
- It eliminates the need to manually script CUDA installation steps in your Dockerfile
- Handles different GPU configurations across different machines automatically
- Includes best practices for CUDA setup that might be complex to implement manually
- Makes the container more portable since it adapts to the host system’s GPU capabilities
- Reduces the risk of driver/CUDA version mismatches that can be tricky to debug
The empty object ({}) after the feature URL means we’re using default settings, but you can customize the installation by adding configuration options like specific CUDA versions or additional components.
Testing the configuration and rebuilding your environment
When you change your Dev Container Gitpod notices the change and offers you the option to rebuild your environment. This will re-apply your changes to your development environment installing any new tools or applying any configuration changes.
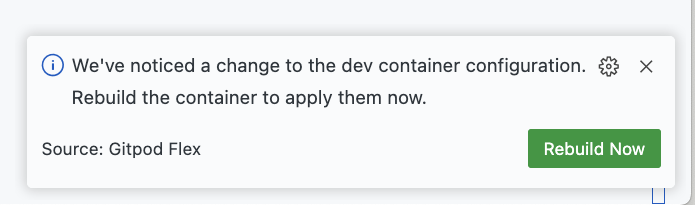
You should also see a “rebuild” button to rebuild the Dev Container:
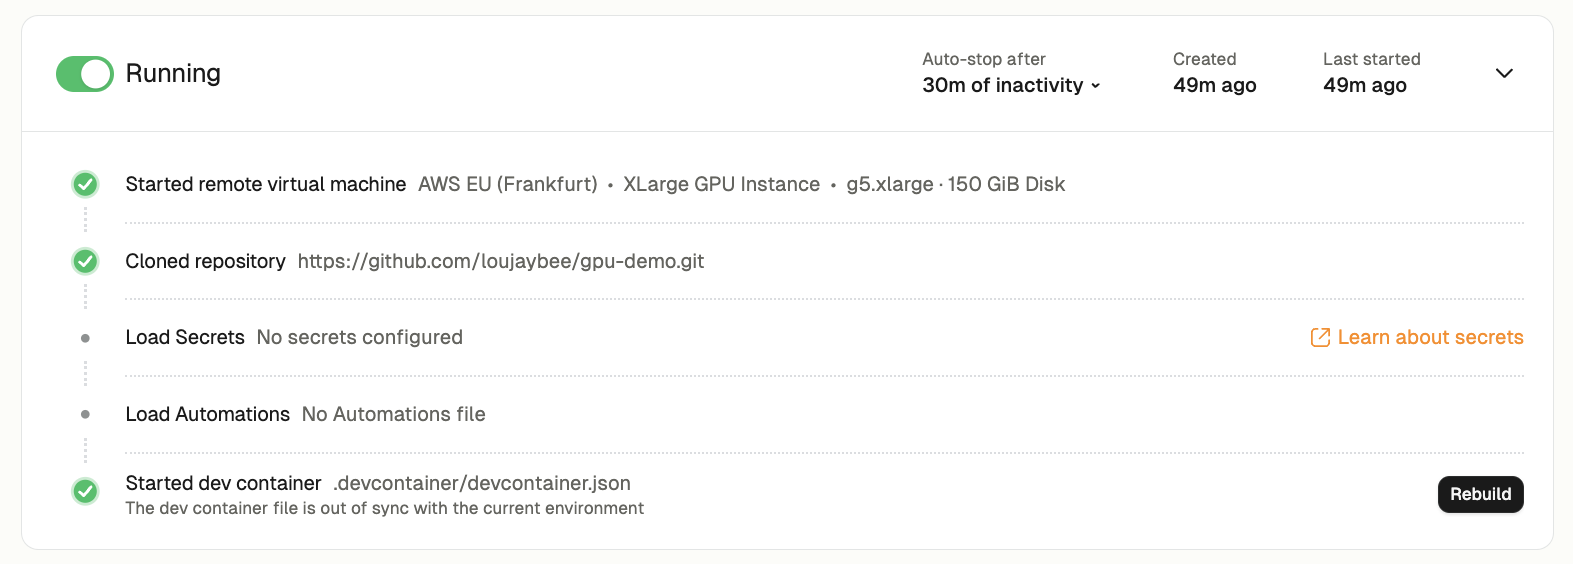
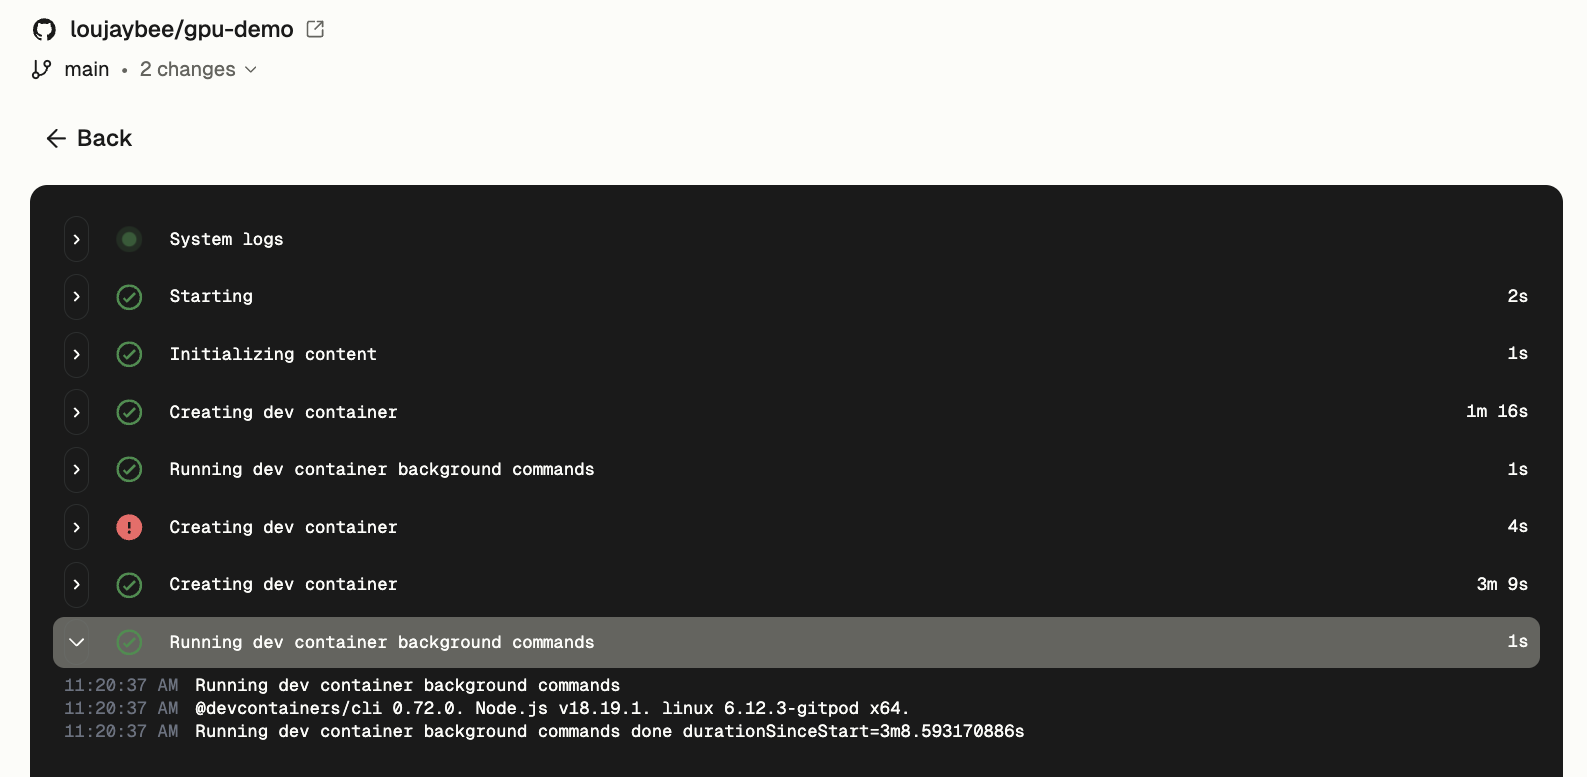
If any of the Dev Container runs, you can inspect the Dev Container logs either directly in your editor or by clicking “logs” on the Dev Container section of the environment detail loading page.
Validating the configuration (e.g. drivers are installed correctly)
When your configuration and environment rebuilds successfully you can test your configuration by running the following command:
bashwatch -n 1 nvidia-smiRunning this command helps verify that:
- Your GPU is properly recognized in the container
- The NVIDIA drivers are working correctly
- CUDA is properly configured
- You can see real-time GPU resource utilization
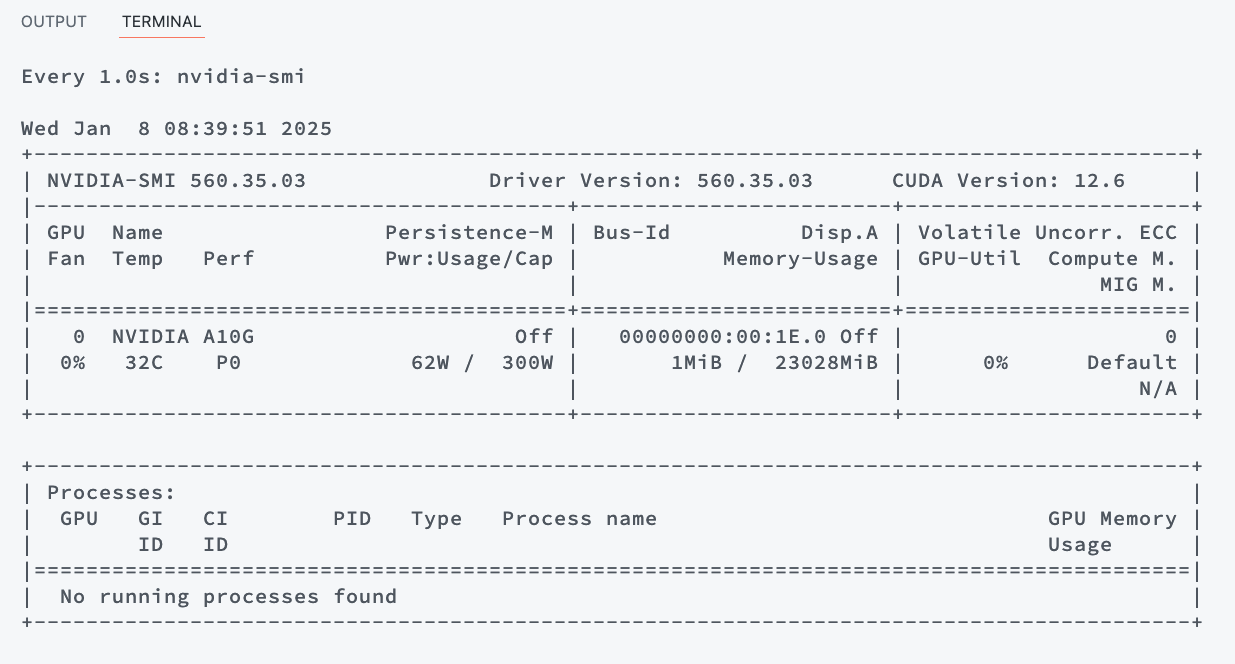
If the command runs successfully and shows GPU information, it confirms your Dev Container GPU configuration is working. If it fails with an error, it likely indicates an issue with the GPU setup that needs troubleshooting.
One click development environments with GPU
You’ve now created a development environment that is repeatable and eliminates many hurdles of GPU development. With your configuration committed you can spin up identical GPU-enabled environments in seconds with persistent storage that can be shared with team members.
