Shared workspace storage with Gitpod: Sync a directory to Amazon S3 using s3fs
A Gitpod workspace is your personal development environment, based on Linux. You connect to a workspace either through a browser editor, or using your desktop editor with SSH. In Gitpod, workspaces are ephemeral as they only live as long as you need them for the current task you’re working on. Then, when you work on a new task, you pick up a new workspace.
Even with ephemeral workspaces though, there are times when you need to access shared data between workspaces. For instance, your team members need to read or write files from their own personal workspaces, and then have those files be accessible by others in the team.
This guide will cover how to set up and automate the mounting of a directory in a workspace so that files are automatically synced with an Amazon S3 bucket using “s3fs”. This effectively creates a “shared file system” using Gitpod.
Syncing directories in a workspace to S3 using S3fs
S3fs allows you to mount an S3 bucket and operate it like a local file system.
In simple terms, when files are added, removed or renamed to this special directory in your workspace, they are automatically synced with a remote S3 bucket. No special commands are required to initiate the syncing. Access to the S3 files can be shared between users, or set up for personal use effectively creating a shared file system.
Step 1: Install AWS CLI and S3FS
Before we begin configuring s3fs as our next step, we will first walk through how to configure both the AWS CLI and s3fs. It’s important these steps are automated so that each subsequent workspace that is started does not require replicating these steps every time. To automate our workspace we’ll add our steps to a .gitpod.yml stored at the root of our repository.
Step 1.1: Create a Dockerfile

 bash
bashtouch .gitpod.DockerfileStep 1.2: Install the awscli and s3fs in your Dockerfile
FROM gitpod/workspace-full

RUN sudo install-packages awscli s3fs
Step 1.3: Create a .gitpod.yml at the root of your repository
bashtouch .gitpod.ymlStep 1.4: Reference the Dockerfile in your .gitpod.yml
image:
    file: .gitpod.Dockerfile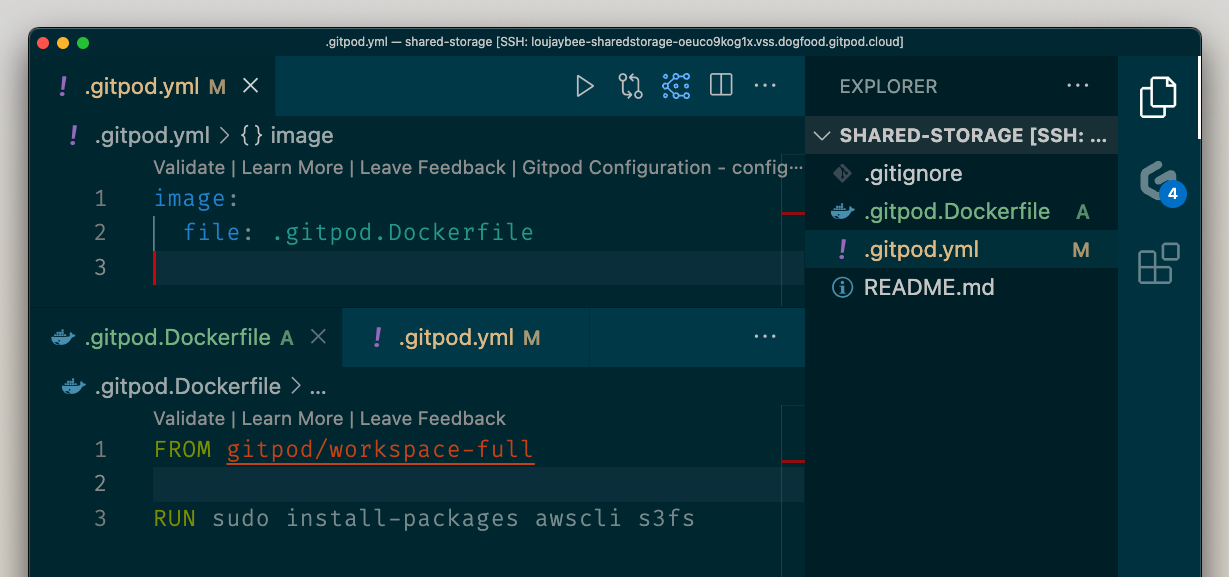
Caption: The full set of file changes to install AWS and S3FS.
Step 1.5: Commit your configuration and start a new workspace
Commit and push your changes to your repository and start a new workspace (restarting your current workspace won’t execute the automation steps). A simple way to start a workspace is to append your repository URL with gitpod.io/# for example using the node repository:
gitpod.io/#https://github.com/nodejs/node
If you’re using Gitpod Enterprise, you’ll need to also include your domain:
<yourcompany.gitpod.cloud>/#<full-repo-url>
Step 2: Authenticate with S3
Ensure that you can access AWS from your workspace. The simplest way is to simply run the command in your workspace, entering an access key and secret.
bashaws configureImportant: The following is a simple way to authenticate with AWS from a workspace. In a subsequent step we’ll cover how to automate AWS access to avoid the use of hard-coded credentials.
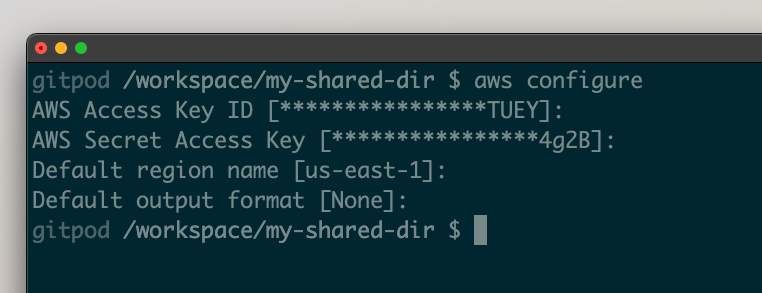
Caption: Example output of the aws configure command
You can validate you are authenticated with your AWS account by running:
bashaws sts get-caller-identity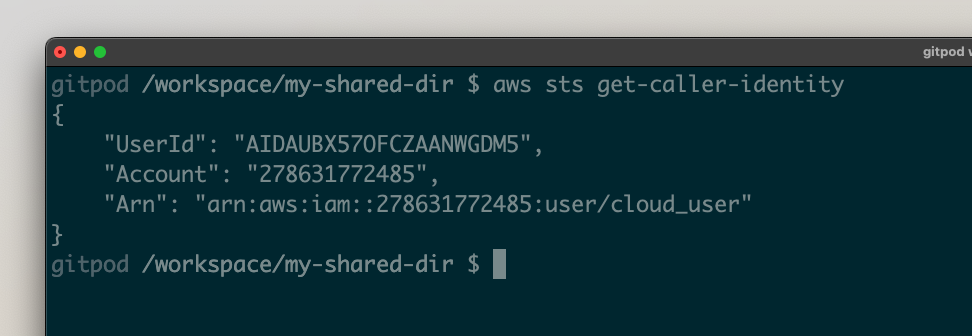
Caption: Successful response of the aws sts get-caller-identity
Step 3: Create an S3 bucket
For our shared storage we need a source of truth for files. For this, we’ll use Amazon S3. If you do not have an S3 bucket create one using the infrastructure code tool of your choice.
Here’s an example way to create a bucket using the AWS CLI:
bashaws s3 mb s3://<your-s3-bucket-name>
Caption: An example S3 bucket created in AWS
Step 4: Create a directory and link to S3
Now we need a directory that will be linked with S3.
Let’s create that in our /workspace directory, as that will also ensure this directory persists between workspace restarts.
bashmkdir /workspace/my-shared-dirConnect the directory to the S3 bucket using the following command, replacing <your-s3-bucket> with your previously created S3 bucket name:
bashs3fs <your-s3-bucket>:/my-shared-dir /workspace/my-shared-dir -o nonemptyNow, your workspace directory /workspace/my-shared-dir should be syncing with S3. Any files added or removed from that directory will be mirrored in your S3 bucket. You can test this by adding a file into that directory:
bashtouch /workspace/my-shared-dir/temp.txtNow, when you list the contents of your S3 bucket, you should see your temporary file:
bashaws s3 ls s3://<your-s3-bucket>/my-shared-dir/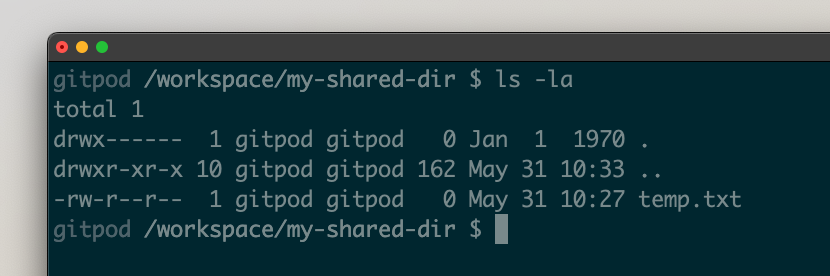
Caption: The files stored in the directory in the Gitpod workspace.

Caption: The files listed out in the S3 bucket.
Caption: The files shown in Amazon S3, in the AWS console.
As the above is not automated, we should take these above commands, and add them into our .gitpod.yml so that when new workspaces are started our directory is created and mounted for all subsequent workspace starts. Update your .gitpod.yml with the following:
image:
    file: .gitpod.Dockerfile

tasks:
    - command: |
          mkdir /workspace/my-shared-dir
          s3fs <your-s3-bucket>:/my-shared-dir /workspace/my-shared-dir -o nonempty
We’re not finished just yet. Because, if we were to open the workspace with the current configuration we’d get an AWS authentication issue. New workspaces aren’t automated to include access to AWS out-of-the-box. Let’s fix that.
Step 5: Automating access to AWS S3
Finally, to automate your AWS access in a secure way without hard coding long-lived secrets into environment variables you should set up OIDC integration.
For a detailed guide through AWS and OIDC together see the AWS OIDC integration guide.
Let’s take a quick look at what that looks like in practice, and walkthrough the commands you’ll need to run:
- Create an identity provider resource in AWS IAM - This is a one-time configuration that grants permission for a specific Gitpod instance to perform authentication with the AWS account that the identity provider configuration is created in. See AWS OIDC.
- Create an AWS role with a trust policy - So that when a workspace authenticates with AWS you control which users, or repositories can assume your role. See IAM roles.
- Assume the AWS role - From your
.gitpod.ymlyou can assume the created AWS role from within your workspace. No hard-coded credentials are required. See using IAM roles.
Once you have followed steps one and two above you should be able to run the following command in your workspace to receive access credentials for your specified AWS account:
bashgp idp login aws --role-arn <your-iam-role-arn>As before you can validate you are correctly authenticated by calling:
bashaws sts get-caller-identityAnd finally, to automate this AWS authentication step, we need to add the auth into our .gitpod.yml before we mount our directory with s3fs:
image:
    file: .gitpod.Dockerfile

tasks:
    - command: |
          gp idp login aws --role-arn <your-iam-role-arn>
          mkdir /workspace/my-shared-dir
          s3fs <your-s3-bucket>:/my-shared-dir /workspace/my-shared-dir -o nonempty
Shared storage across workspaces
Now, when you open your repository in Gitpod, the shared directory will be created locally, and synced automatically with the remote S3 bucket. Users of your development environment can now add, delete or rename files in that directory as if they were working on their local file system and they’ll sync automatically to S3 where they can be accessed by other users.
