Create self-service preview environments with Gitpod and GitLab
TL;DR
- This is an example of how to use the Gitpod CLI in a pipeline
- We’ll be using GitLab, but you can make this work on other pipelines e.g. Jenkins, GitHub Actions
- The goal is to show you a small taster of what is possible using the CLI outside of individual developers using the CLI on their local machines
In my past role on a Platform Team, I often crafted scripts with various CLI tools to enhance our developer squads’ daily experience so naturally, I was thrilled with the launch of Gitpod’s CLI! In case you missed it, here’s the changelog: “Take Gitpod to your local command line”.
This guide will demonstrate how to incorporate the Gitpod CLI into your CI/CD pipeline.
The result? A cloud development environment, equipped with all necessary tools and dependencies for each project commit.
I’ll be using GitLab for this example, but this can be configured in other CI/CD tools like Jenkins, CircleCI, GitHub Actions, Azure DevOps, etc. Let’s dive in!
Getting Started
Step 1: Set up a new pipeline
For the sake of simplicity, I’ll be using GitLab’s Spring Boot templates. You can view the repo I reference in this guide here.
Before we can throw these all into a script, let’s set the scene. We need to do a few things first: installing the CLI and logging into your Gitpod organisation. It’s worth having Gitpod installed locally for testing purposes. We’ll recreate these for the pipeline.
To install the CLI, download the binary.

 bash
bashwget -O gitpod https://gitpod.io/static/bin/gitpod-cli-linux-amd64
chmod +x gitpodThen, authenticate using Gitpod Tokens. Create a variable called $GITPOD_TOKEN and another named $GITPOD_ORG. To fetch your organisation ID, run gitpod org list locally.
bash./gitpod login --token $GITPOD_TOKEN --org $GITPOD_ORGWe aim to create the Gitpod workspace in a GitLab environment, so we need the dynamic workspace ID.
bashWORKSPACE_ID=$(./gitpod ws create gitlab.com/pawlean/spring-boot-with-gitpod-cli --dont-wait)Here’s what the final script should look like for the job:
ymlstages: # List of stages for jobs, and their order of execution
- dev
gitpod-workspace-creation:
stage: dev
script:
- wget -O gitpod https://gitpod.io/static/bin/gitpod-cli-linux-amd64
- chmod +x gitpod
- ./gitpod login --token $GITPOD_TOKEN --org $GITPOD_ORG
- WORKSPACE_ID=$(./gitpod ws create gitlab.com/pawlean/spring-boot-with-gitpod-cli --dont-wait)
- echo "WORKSPACE_ID=$WORKSPACE_ID" >> gitpod_url.env
- echo $WORKSPACE_ID # helpful for debugging :)
artifacts:
reports:
dotenv: gitpod_url.env
environment:
name: dev
url: 'https://gitpod.io/start/#$WORKSPACE_ID'Step 2: Launch the pipeline
Commit these changes, and the pipeline should start automatically. Go to Build > Pipelines and click on status for a detailed view.
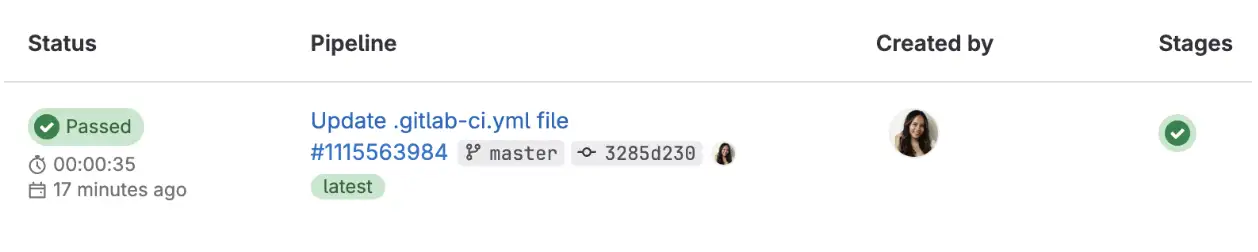
Job succeeded! Nice.
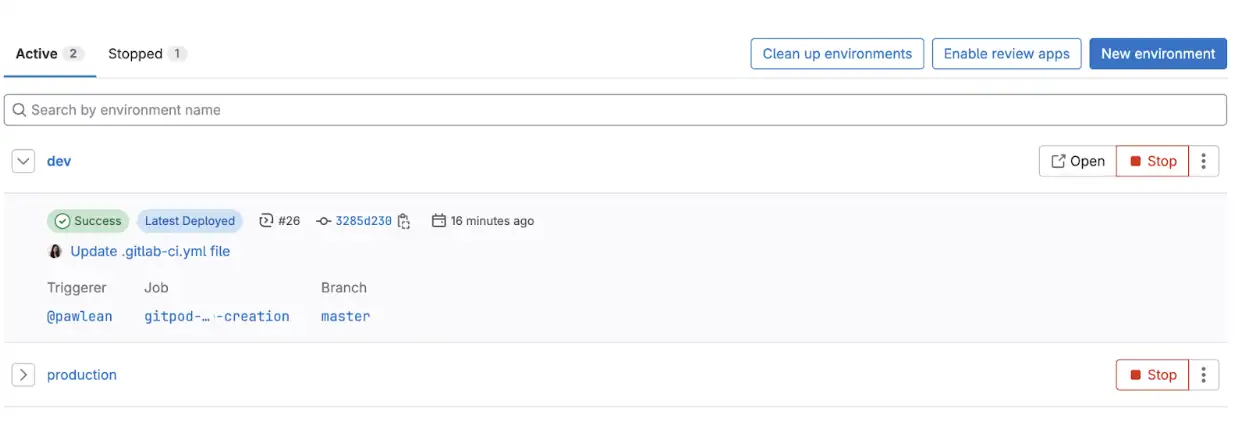
Step 3: Verify the Environment
Head to Operate > Environments. Now, collaborators can easily review your latest commits in a cloud development environment.
This is just the beginning!
This guide just scratches the surface of what is possible with the Gitpod CLI either as a developer or platform engineer.
You can extend this setup to run the pipeline on specific branches or include it in merge requests, among other possibilities. The sky’s the limit! What will you build?
Special thanks to George, Lou, Filip and Jean-Phi for their invaluable assistance with GitLab and reviewing this guide.
